TSA-1: Zero Trust at Grab
Introduction
The purpose of this lab is to create a ’tiny-scale’ architecture that simulates the Zero Trust system used at Grab. Zero Trust is a security model that assumes no part of the network is secure and requires verification for every access request. This model is crucial for protecting sensitive data and ensuring secure communication between services.
Although I haven’t been part of the Grab team that set up this architecture, I have thoroughly researched their approach by studying their blog posts here. Combining this information with my own knowledge and experience, I aim to implement a similar basic workflow. This will help us understand the fundamental concepts and practices of Zero Trust security in a Kubernetes environment.
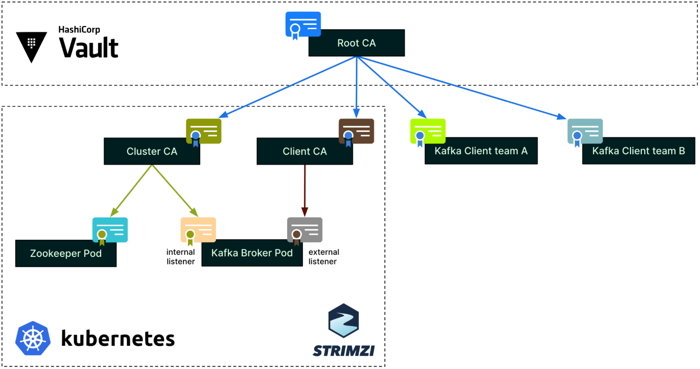
Grab uses a production-ready Kubernetes cluster to run this architecture. For this lab, I’ll use minikube as our Kubernetes environment. Minikube is an open-source tool that lets us run a single-node Kubernetes cluster locally, providing a powerful yet simplified setup perfect for development and testing. It includes many features of a full-scale Kubernetes setup but reduces the complexity, making it easier to manage and understand. Using minikube, we can create an environment that mimics a production Kubernetes cluster while remaining easy to set up and work with. You can find the CA tree that we try to implement here:

Zero Trust CA Tree at Grab
Grab’s Architecture Concept
Grab’s real-time data platform team, also known as Coban, decided to use mutual Transport Layer Security (mTLS) for authentication and encryption. mTLS enables clients to authenticate servers, and servers to reciprocally authenticate clients.
They opted for Hashicorp Vault and its PKI engine to dynamically generate clients and servers’ certificates. This enables them to enforce the usage of short-lived certificates for clients, which is a way to mitigate the potential impact of a client certificate being compromised or maliciously shared.
For authorisation, they chose Policy-Based Access Control (PBAC), a more scalable solution than Role-Based Access Control (RBAC), and the Open Policy Agent (OPA) as their policy engine, for its wide community support.
To integrate mTLS and the OPA with Kafka, the Coban leveraged Strimzi, the Kafka on Kubernetes operator. They have alluded to Strimzi and hinted at how it would help with scalability and cloud agnosticism. Built-in security is undoubtedly an additional driver of their adoption of Strimzi.
Pre-requisites
minikubeinstalled.helminstalled.opensslinstalled.vaultinstalled, run as client to communicate with vault cluster on minikube.- The source code used in this post can be found here, tsa-grab-zero-trust.
Configuration steps
Based on the points mentioned in the above sections, we can list several objectives that we should complete when we finish the lab, as follows:
- Install Vault and set up the Root CA, which is used to sign the Intermediate CA.
- Set up the Cluster CA to secure the communication services inside the Kafka cluster.
- Set up the Clients CA, then implement mutual TLS between clients and Kafka brokers.
- Implement OPA in the cluster for authorization.
1. Install Vault and set up Root CA
In this section, we will set up a basic Vault cluster running on minikube. In the scope of this lab, we’ll keep it on the same Kubernetes cluster but run it in a separate namespace to simulate a dedicated Vault cluster, similar to what Grab uses.
First of all, we need to start our Minikube, which will be the main environment used for this lab. And then create a namespace dedicated for Vault cluster.
minikube start
kubectl create namespace vault
alias kv='kubectl -n vault' # make an alias for future queries
Add the HashiCorp Helm repository to your local Helm, then install Vault chart with default values:
helm repo add hashicorp https://helm.releases.hashicorp.com
helm repo update
helm install vault hashicorp/vault -n vault
Wait until Vault is up and running. You should see output similar to this when executing below command:
$ kv get pod,svc
NAME                                       READY   STATUS    RESTARTS   AGE
pod/vault-0                                0/1     Running   0          40m
pod/vault-agent-injector-d986fcb9b-ckrkv   1/1     Running   0          40m

NAME                               TYPE        CLUSTER-IP      EXTERNAL-IP   PORT(S)             AGE
service/vault                      ClusterIP   10.99.87.187    <none>        8200/TCP,8201/TCP   40m
service/vault-agent-injector-svc   ClusterIP   10.100.251.30   <none>        443/TCP             40m
service/vault-internal             ClusterIP   None            <none>        8200/TCP,8201/TCP   40m
The vault-0 pod is not ready yet because we haven’t unsealed Vault. First, expose the vault service so we can connect to it from our laptop. Use the minikube service feature:
$ minikube service -n vault vault
|-----------|-------|-------------|--------------|
| NAMESPACE | NAME  | TARGET PORT |     URL      |
|-----------|-------|-------------|--------------|
| vault     | vault |             | No node port |
|-----------|-------|-------------|--------------|
😿  service vault/vault has no node port
🏃  Starting tunnel for service vault.
|-----------|-------|-------------|------------------------|
| NAMESPACE | NAME  | TARGET PORT |          URL           |
|-----------|-------|-------------|------------------------|
| vault     | vault |             | http://127.0.0.1:57974 |
|           |       |             | http://127.0.0.1:57975 |
|-----------|-------|-------------|------------------------|
[vault vault  http://127.0.0.1:57974
http://127.0.0.1:57975]
❗  Because you are using a Docker driver on darwin, the terminal needs to be open to run it.
As the warning suggests, if you are in the same situation, open a new terminal tab and use the following command to set up the connection. Remember to note the seal key and root token from the output:
export VAULT_ADDR='http://127.0.0.1:57974'
vault operator init
Use below command or you can paste the URL to browser to unseal it directly (remember to replace your keys):
vault operator unseal <1st-unseal-key>
vault operator unseal <2nd-unseal-key>
vault operator unseal <3rd-unseal-key>
Verify the installation by checking pod:
$ kv get pod
NAME                                   READY   STATUS    RESTARTS   AGE
vault-0                                1/1     Running   0          82m
vault-agent-injector-d986fcb9b-ckrkv   1/1     Running   0          82m
Now, we need log in to Vault using the root token noted earlier. Then, we will enable PKI engine inside Vault, and configure it as our Root CA:
vault login <root-token>
vault secrets enable -path=pki pki
# Tune the pki secrets engine to issue certificates with a maximum time-to-live (TTL)
vault secrets tune -max-lease-ttl=87600h pki
# Create Root CA
vault write -field=certificate pki/root/generate/internal \
    common_name="RootCA" \
    issuer_name="root-ca" \
    ttl=87600h > root-ca.crt
# Role allows certificates to be issued for any CN and SAN specified in the CSRs.
vault write pki/roles/2023-servers allow_any_name=true
We are then ready for the next steps with Cluster CA and Client CA configuration.
2. Setup the Cluster CA:

Server authentication process for internal cluster communications
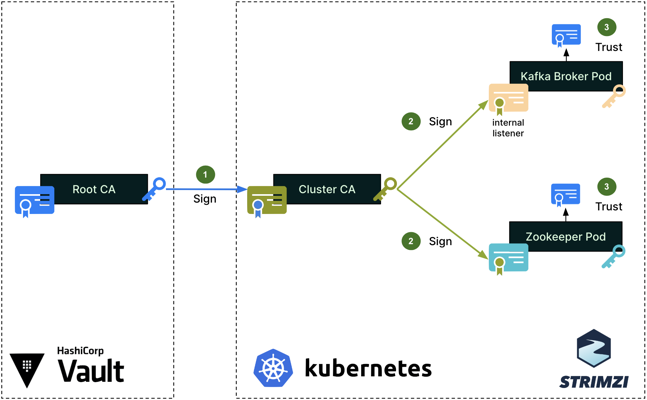
To secure the cluster’s internal communications, like the communications between the Kafka broker and Zookeeper pods, Strimzi sets up a Cluster CA, which is signed by the Root CA (step 1). The Cluster CA is then used to sign the individual Kafka broker and zookeeper certificates (step 2). Lastly, the Root CA’s public certificate is imported into the truststores of both the Kafka broker and Zookeeper (step 3), so that all pods can mutually verify their certificates when authenticating one with the other.
In this scenario, Strimzi will set up a Cluster CA within the kafka namespace, and this Cluster CA certificate will be signed by the Root CA managed by Vault in the vault namespace. Instead of letting Strimzi automatically create our Cluster CA, we will generate our own key and CSR, then submit the CSR to be signed by the Root CA.
# Create key used for Cluster CA, then the CSR from the key
openssl genpkey -algorithm RSA -out cluster-ca.key -pkeyopt rsa_keygen_bits:2048
openssl req -new -key cluster-ca.key -out cluster-ca.csr -subj "/CN=ClusterCA"
# Sign the CSR with Root CA key, output include the whole chain in the certificate file
vault write -format=json pki/root/sign-intermediate \
    [email protected] \
    format=pem_bundle ttl="43800h" \
    | jq -r '.data.certificate' > cluster-ca.crt
After the .crt and .key files are ready, we create the kafka namespace and import them as secrets stored inside the Kubernets cluster. Optionally, we can create the PKCS #12 format for the certificate if necessary.
kubectl create namespace kafka
alias kk='kubectl -n kafka' # make an alias for future queries
# We can add cluster certificate in PKCS #12 if the application support this format only
openssl pkcs12 -export -in cluster-ca.crt --nokeys -out cluster-ca.p12 -password pass:p12Password -caname cluster-ca.crt
# Create secrets for our Cluster CA cert and key
kk create secret generic tiny-cluster-ca-cert \
    --from-file=ca.crt=cluster-ca.crt \
    --from-file=ca.p12=cluster-ca.p12 \
    --from-literal=ca.password=p12Password
kk create secret generic tiny-cluster-ca --from-file=ca.key=cluster-ca.key
We need to label and annotate the secrets so that Strimzi can use them to implement our keys and certificates in the Kafka cluster:
# Label and annotate the secrets then the strimzi can setup based on them
kk label secret tiny-cluster-ca-cert strimzi.io/kind=Kafka strimzi.io/cluster=tiny
kk label secret tiny-cluster-ca strimzi.io/kind=Kafka strimzi.io/cluster=tiny
kk annotate secret tiny-cluster-ca-cert strimzi.io/ca-cert-generation=0
kk annotate secret tiny-cluster-ca strimzi.io/ca-key-generation=0
Now, we create Strimzi’s CRDs using Helm, utilizing a custom values file (kafka/strimzi-values.yaml) to address issues related to the KUBERNETES_SERVICE_DNS_DOMAIN environment variable.
helm repo add strimzi https://strimzi.io/charts/
helm repo update
helm install strimzi-kafka strimzi/strimzi-kafka-operator --namespace kafka -f kafka/strimzi-values.yaml
Then, we can apply our Kafka cluster creation manifest:
kk apply -f kafka/kafka-cluster.yaml
Finally, we need to verify if the Cluster CA has been setup correctly:
# Export Kafka and Zookeeper certificates
kk get secret/tiny-kafka-brokers -o jsonpath='{.data.tiny-kafka-1\.crt}' | base64 -d > kafka.crt
kk get secret/tiny-zookeeper-nodes -o jsonpath='{.data.tiny-zookeeper-1\.crt}' | base64 -d > zookeeper.crt
# Veirfy the certificates
openssl verify -CAfile cluster-ca.crt kafka.crt
openssl verify -CAfile cluster-ca.crt zookeeper.crt
The command openssl verify -CAfile cluster-ca.crt zookeeper.crt is used to verify the certificate chain of the zookeeper.crt certificate against the provided Certificate Authority (CA) certificate (cluster-ca.crt) by following steps:
- Reads the CA Certificate: The command reads the cluster-ca.crt file, which contains the public key and details of the Cluster CA.
- Reads the Target Certificate: The command reads the zookeeper.crt file, which contains the public key and details of the Zookeeper certificate.
- Checks the Signature:: The command checks if the Zookeeper certificate (zookeeper.crt) is signed by the Cluster CA (cluster-ca.crt). It does this by verifying the signature on the Zookeeper certificate using the public key in the Cluster CA certificate.
- Verifies the Certificate Chain: The command ensures that the entire chain of trust from the Zookeeper certificate to the Cluster CA is valid.
You should see the below output:
kafka.crt: OK
zookeeper.crt: OK
zookeeper.crt: OK: This output indicates that the verification was successful. It means:
- The Zookeeper certificate (
zookeeper.crt) is indeed signed by the Cluster CA (cluster-ca.crt). - The certificate chain is valid and unbroken.
- The Zookeeper certificate is trusted by the Cluster CA.